Along with the big change from tape-based recording to computer based recording was a huge decrease in the price barrier to getting a home recording setup up and running. Used to be that there was a huge “quality divide” between what you could accomplish at home as opposed to a professional studio.
Well those days are gone forever now and depending on what kind of music you make and your skill level, you can actually have a world-class ‘facility’ right in your laptop computer! However, depending on how long you’ve been working on the engineering side of the industry there are still some analog considerations you need to make regarding studio monitors, control room acoustics and microphone selection and placement.
Lately I’ve been receiving calls to act as a consultant to people who want to get their home situation up and running in tip top form, or to transition their existing home facility into the computer age by having me work out a scenario to make the computer the heart of things instead of the “holy alliance’ of tape machine and mixer.
One such call came recently from longtime studio client Bob Trach who had started making the transition to computer-based recording years ago but needed to update the analog side of things and have me go through and see how to best integrate the best of the old stuff with the new setup.

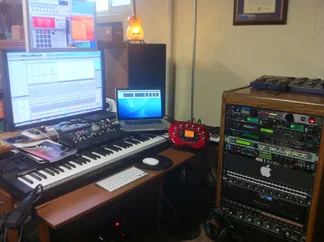
Rack mount mixers and patchbay
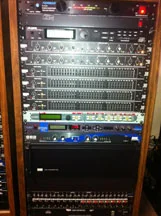
EQ Channels and outboard processing
Basically Bob had two big racks of analog gear and a couple of patchbays, giving him the equivalent of a mixer analog signal path but through the use of outboard EQs and processing of various types. One of the big advantages of mixing entirely in the computer is that you can work on the mix in stages if you want and when you save and come back later, It’s exactly how you left it, ready to be taken to the next step. This one thing is a huge benefit of the computer; I remember having to scramble to complete a mix in the allotted time that took hours to set up and 15 pieces of outboard gear and if you had to abandon the mix due to time constraints, you had to start over from the absolute beginning next time.
So the task was to eliminate as much of the old analog gear as possible that would be duplicated by the software and only keep units that contributed something unique to the studio. Out went a bunch of analog EQs, compressors and all but one of the patchbays. Kept were a reverb (useful for having some verb while tracking), an Antares Vocal Processor and a couple of fave synth modules.
Bob is a guitarist who plays both electric and acoustic (nylon and steel string) and when he’s composing doesn’t want to have to fool around with configuring things on the fly. He wanted a setup where everything is connected and ready to go all the time; just push the record enable button and go. That meant adding another audio interface to the setup to accommodate all the simultaneous analog input from the various mics, synth modules and effects units. This gave each analog source a dedicated input into the system-neat & tidy!
Also in the analog realm was dealing with the various microphones he would use to record his various guitars and to make sure they come up in the headphones at the right level and sounding good. This also meant devising some mic positioning guidelines to help guard against the kinds of sounds that homes produce, like flushing toilets and furnaces.
Bob has quite a collection of virtual instruments as well so the most significant task was to build him a really complete, scrupulously labeled recording template file so that when a project was started, everything was in place and routed correctly. This meant all virtual instruments were installed with default patches enabled, effects were installed with auxiliary sends already routed, MIDI tracks already created for each instrument and assigned correctly, and all of the internal connections made to make everything appear in the headphones with no fuss. Included in this task too was installing basic dynamics control processing and some overall processing on the Master Bus.
This took quite a long time and a thorough treatment required a lot of naming and configuring but the end result is destined to save him a bunch of time and confusion. Which input was the Roland in again? No guesswork now and no distraction from creativity.
The end result is that Bob is really happy with the new setup and music recording is only a couple clicks away instead of 10 minutes configuring your software! Here’s what we came up with in the end: